Testing
We require every component to be thoroughly tested. onyx uses Playwright and Vitest for testing.
Component tests
Generally playwright component tests (kept in .ct.tsx-files) suffice to test a component.
Component tests must include screenshot tests to ensure that any style changes happen intentionally and can be approved by our UX. To easily generate and test screenshots for all main states the executeMatrixScreenshotTest utility is to be used.
test.describe("Screenshot tests", () => {
  executeMatrixScreenshotTest({
    name: "OnyxComponent (densities)",
    rows: ["default", "hover", "active", "focus-visible", "skeleton"],
    columns: DENSITIES,
    hooks: {
      beforeEach: async (component, page, column, row) => {
        /**
         *  TODO: Prepare the component before the screenshot
         *  e.g.:
         */
        if (row === "hover") await component.hover();
        if (row === "focus-visible") await page.keyboard.press("Tab");
        if (row === "active") await page.mouse.down();
      },
    },
    component: (column, row) => (
      // TODO: Set the props based on the given row and column
      <OnyxComponent propName="value" density={column} skeleton={row === "skeleton"} />
    ),
  });
});
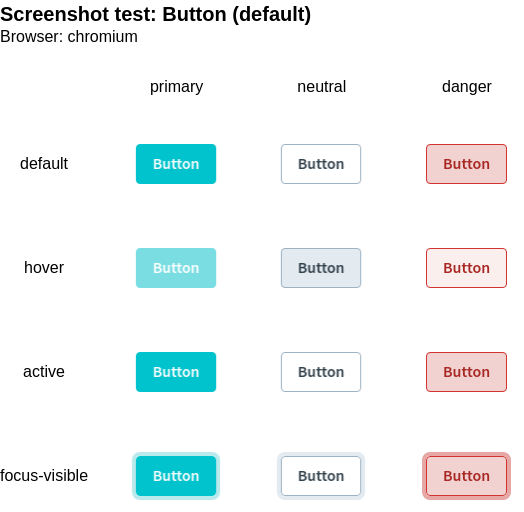
The utility creates a screenshot for every combination of rows and columns. These are then combined in into grid and saves a single screenshot of it. Here is an example for the OnyxButton:

WARNING
Choose the columns and rows carefully, as the number of combination grows quadratically. It might be preferable to create a new screenshot matrix instead of adding more columns/rows.
Accessibility tests (using axe-core) are also run for every combination.
For standalone tests or more complicated setups, toHaveScreenshot can be used directly:
test("should show hover effect", async ({ mount }) => {
  // ARRANGE
  const component = await mount(<OnyxComponent propName={value} style="max-width: 8rem;" />);
  await component.hover();

  // ASSERT
  await expect(component).toHaveScreenshot("hover-effect.png");
});
Development
In our monorepo component tests are run non-interactively using the pnpm test:playwright script.
To use Playwright interactively run pnpm exec playwright test --ui (add the --headed flag to open the see the- browsers) in the package directory.
CI
To investigate failing playwright tests from the CI locally: You can run pnpm gh:show-report in the root, which will
- Download the
html-report--attempt-xartifact after the pipeline has finished. - Unzip the archive
cdinto the package you want to see the report for- Run
pnpm dlx playwright show-report
VSCode
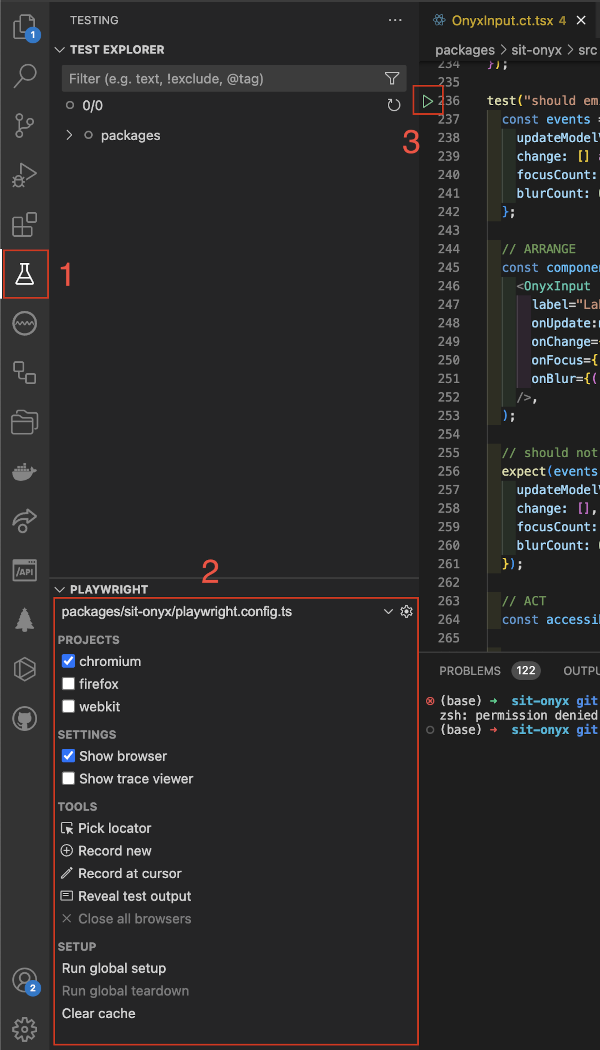
We highly recommend to use the Playwright Test for VSCode extension for running component tests in development. It allows to build and run specific tests interactively, directly from the IDE (see annotation 3 in screenshot beneath). If you encounter any issues please make sure
- to run the
pnpm buildscript at least once for the package - to only select the playwright config file for the current package your are testing
- to run
Run global teardown,Close All BrowsersandClear Cache
You find the playwright VSCode extension settings (see annotation 2 in screenshot beneath) in the Testing section of VSCode (annotation 1).

Unit tests
For self-contained logic, excluding Vue components, unit tests (kept in .spec.ts-files) can be written using Vitest.
In our monorepo unit tests are run using the pnpm test script.
